Preferences
General
| Option | Description | Default |
|---|---|---|
| Show Inactive Items In Dropdowns | Determines if list items marked Inactive will be included as valid options for selection in a dropdown. Easily review List data to understand if a field is marked Inactive. | Unchecked |
| Include Base Book With Adjustment Book | When adjustment-only books are queries, checking this option will include the base book values. | Unchecked |
| Check Connectivity On Open | Contacts NetSuite immediately when opening a workbook to validate that the connection is available and that the authentication token is valid. | Checked |
| Pause Connection on Open | When checked, calculations will be paused initially when Excel is opened. | Unchecked |
| Periods for Trailing to Date | The number of periods to utilize for the TTD period range. | 12 periods |
| Skip TTD Periods Greater Or Equal To | When checked, TTD period range calculations will skip any periods greater than or equal to the amount selected. | Checked, 13 |
| Date Handling | Select the check box to override NetSuite's date settings for your instance of Excel. |
Note
Easily restore preferences to default by clicking the button Reset to Default.
Tree Options
| Option | Description | Default |
|---|---|---|
| Grouping Level | When utilizing Standard Report Templates, a tree structure of grouping levels for accounts is created based off the GL Account levels. This Grouping Level option indicates how expanded or collapsed a user would like their template to appear upon initial creation if the Enable Account Grouping checkbox is checked. | 1 |
| Enable Account Grouping | Enabling Account Grouping will ensure that outline levels (grouping) are displayed by default when a Standard Report Template is created. Unchecking this option will result in all accounts levels being displayed. | Checked |
| Include Cumulative Translation Adjustment in Trial Balance | Includes the row and formula for the Cumulative Translation Adjustment in the Trial Balance Template. | Checked |
Caching
| Option | Description | Default |
|---|---|---|
| Store Values on Open | Stores function execution values temporarily in memory upon opening a workbook. When unchecked, function calculations will trigger calls to NetSuite to recalculate the value. When checked, the current state of the workbook is preserved, and refresh will only occur when the cached values expire or if the sheet or workbook is refreshed via the Refresh option in the ribbon | Checked |
| Cache Function Execution | Stores calculated NetSuite function results temporarily in memory to ensure more efficient results upon editing reports or changing parameters | Checked |
| Expire Cached Items After | Determines how long the saved NetSuite function cache (different from List Cached values) will be maintained before a new NetSuite call will occur if re-run, specified in hours, minutes, and seconds | 5 minutes |
Custom Segments
To review how to edit your preferences for custom segments, refer to the Custom Segments page.
Aging Options
| Option | Description | Default |
|---|---|---|
| Aging Based On | Determines the date that will be used to evaluate aging buckets. | Due Date |
| Repeat | Determines the number of separate time buckets show in the aging report by repeating the interval that many times. An additional column displaying a summary Greater than the max date range will always be displayed as well (ex: >90 Days). | 3 |
| Interval | Determines the number of Days, Weeks, Months or Periods included in each time bucket of the aging report. | 30 Days |
| Intervals set to... | Regular will utilize the Repeat and Interval options explained above to create the aging report. Irregular allows a user to manually enter the specific day count for each time bucket in the aging report. | N/A |
Advanced
| Option | Description | Default |
|---|---|---|
| Release Channel | As Finsyte automatically updates Finsyte versions, the release channel determines what release a user is on. Switching the Release Channel may require and restart of Excel to re-apply the new version. | Release |
| Max Outstanding Requests | Configures the maximum number of simultaneous requests issued. This number should be less than or equal to the max concurrency limit defined in NetSuite for the Finsyte TBA integration record. | 4 |
| Requests Per Batch | Controls how many Excel function call requests to attempt to batch at one time. Values larger than 500 can result in paging, which may impact performance. Smaller values will result in more calls to NetSuite, but may perform better when dealing with larger data sets | 500 |
| Log Level | Indicates the level of logging displayed when you choose Diagnostics > Show Log. Selecting any level will display that level and all levels below. If you want to see everything the application logs, choose Verbose. | Information |
| GLAccountName Property | The column from the GL Accounts list to return for the GLAccountName function. | AccountSearchDisplayName |
| Inaccessible Accounts Return 0 | Rather than returning an error is an account is not accessible for a certain subsidiary, this option, when checked, will return 0 instead. | Checked |
| Entity Field Name | The column name used for Entity names in the dropdown and Range functions. Review available names by returning the Entity List. | SelectValue |
List Refresh Options
| Option | Description |
|---|---|
| List Refresh Options | Select which lists in the From List on the Finsyte ribbon are refreshed when Refresh Data > List Data is selected. |
| List Record Limits | Select a list option and define its record limit. Any list not available here will always return all records (ex: Accounts). |
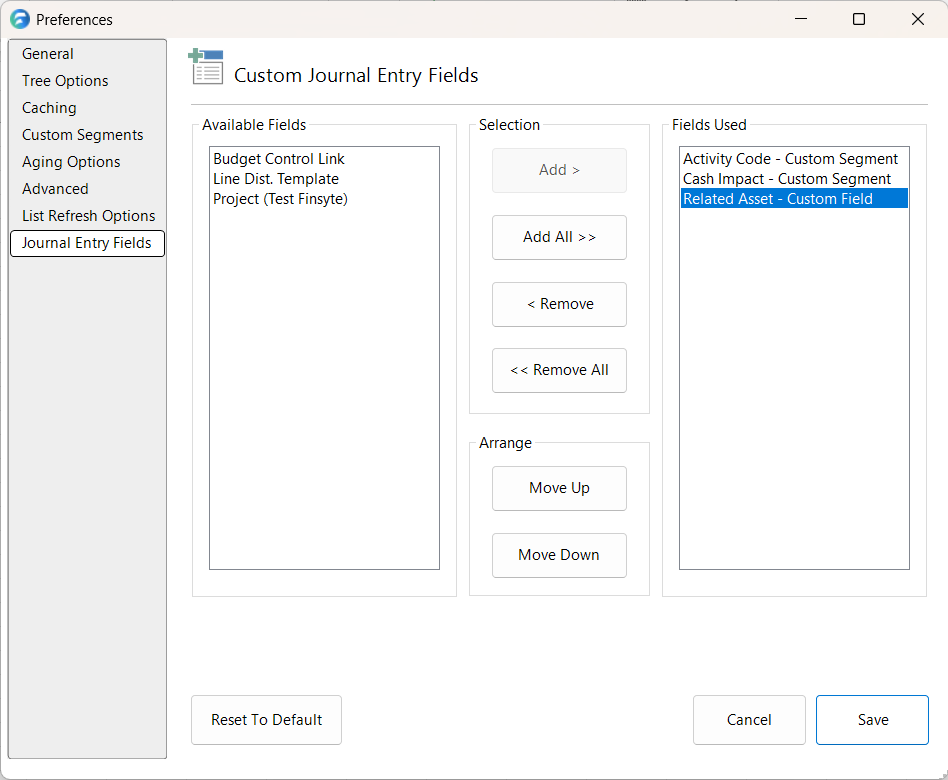
Journal Entry Fields
If your company is utilizing Custom Segments and/or Custom Fields inside of NetSuite, any segments outside of the defaults of Location, Department and Class, can be used in a Journal Entry Template. Finsyte makes it easy to manage which custom segments are available for use within the Preferences dialog.
- Any custom segments or custom field that your company has set up in NetSuite will be visible on the left hand side dialog called Available Fields
- Select Any/All custom segments/fields that you want included and visible in the Journal Entry template and select an Add option
- Order the segments using the Move Up and Move Down buttons. This will determine which order the segments appear in the template
- Once the segments are set up, select Save.
The settings here...
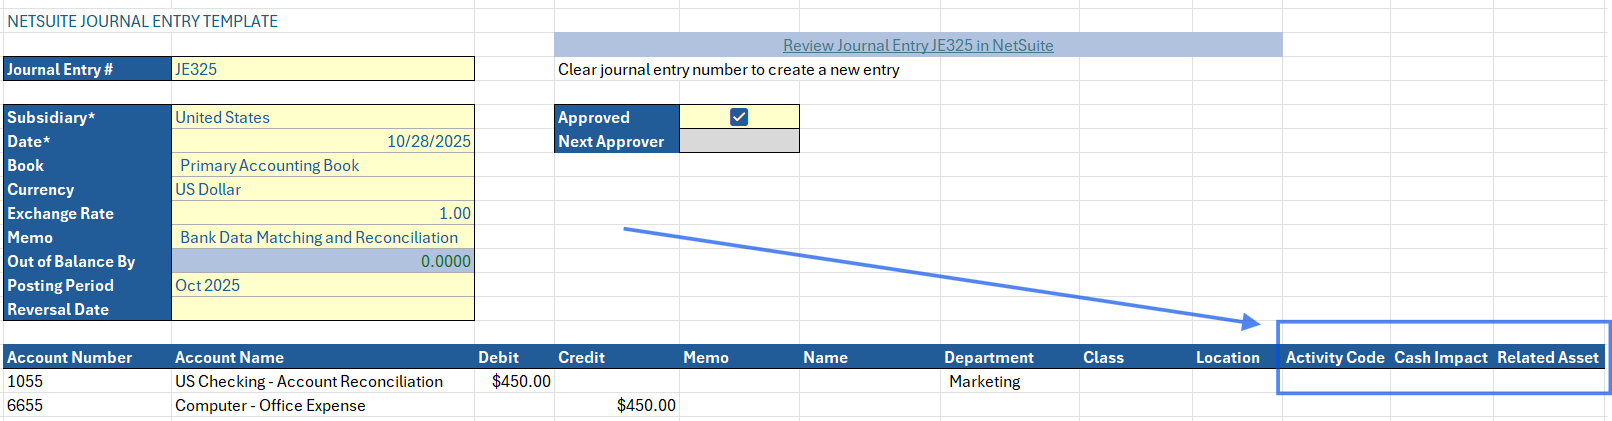
Results in the Journal Entry template including these options...
Note
Custom Segments set up in Preferences are applied to only the individual Finsyte instance, not the entirety of a company.